

Table of Contents
- Immediate Actions During a Storm
- How to Find a Roof Leak in the Attic
- Signs of Storm Damage on Shingles
- Temporary Roof Repair Methods
- Emergency Roof Tarping Services and Setup
- Documenting Damage for Insurance Claims
- When to Call a Professional Roofer
- Preventative Maintenance After the Storm
- Frequently Asked Questions
Last Updated: September 27, 2026
Immediate Actions During a Storm
When a roof leak after storm occurs, prioritize safety first. Stay indoors until conditions are safe, then move quickly to prevent water from entering your home.
Check your attic immediately. Look for active dripping or water pooling on the underside of the roof. If you spot water intrusion, place buckets beneath the drips to catch water and protect your ceilings and insulation.
Turn off electrical circuits in affected areas if water is near wiring or outlets. Call a professional if you’re unsure about safety.
Open windows and doors in affected rooms to increase air circulation and prevent mold growth, which can begin within 24-48 hours. Move furniture and personal items away from wet areas.
Document everything with photos and video before you touch anything. Insurance adjusters need to see the damage in its original state. Shoot wide shots and close-ups of wet areas, damaged shingles, and water stains.
How to Find a Roof Leak in the Attic
Finding the leak source is easier in the attic. Go up during daylight when natural light reveals water stains and damage more clearly.
Look for dark stains on roof underlayment and insulation. Trace stains upward to find where water enters the roof structure, since water doesn’t always leak straight down.
Check the attic for moisture around:
- Roof penetrations (vents, chimneys, flashing)
- Valleys where two roof planes meet
- Areas near gutters and downspouts
- Spots where branches hang over the roof
If you can’t find an obvious stain, wait for the next rain and watch for active dripping. Mark the spot with tape or chalk so you can locate it again from outside.
Never walk on wet insulation or roof decking. You can fall through or cause structural damage. Stick to roof trusses and beams that can support your weight.
Signs of Storm Damage on Shingles
Inspect your roof from the ground with binoculars before climbing a ladder. Storm damage typically appears as missing, cracked, or lifted shingles.
Missing shingles expose underlayment to water intrusion, while cracked or lifted shingles create gaps for water penetration.
Check for:
- Shingles with corners or edges torn away
- Granule loss (bare spots showing the mat underneath)
- Shingles lifted at the edges or corners
- Dents or impact marks from hail or debris
- Flashing that’s bent, cracked, or separated from the roof
Gutter blockage causes water backup into fascia, soffits, and walls. Clear gutters and downspouts immediately after a storm.
Storm damage isn’t always obvious from ground level. Missing shingles are easy to spot, but small cracks and lifted edges require closer inspection. If you’re unsure, a professional inspection catches damage you might miss.
Temporary Roof Repair Methods
Temporary repairs stop active water intrusion but aren’t long-term solutions. Before attempting any repair, assess whether the risk is worth the reward.
Safety gear and ladder protocols
Proper safety equipment is non-negotiable. Wear a safety harness secured to a fixed anchor point, use a ladder rated for at least 250 pounds capacity positioned at a 75-degree angle, wear slip-resistant footwear, and avoid wet surfaces or rain. Never lean sideways from a ladder; reposition it instead. Have a spotter on the ground.
Wet roofing materials are extremely slippery. Use a roof ladder to distribute weight and prevent sliding, or wait for the roof to dry. Never work alone or at height during active weather or poor visibility.
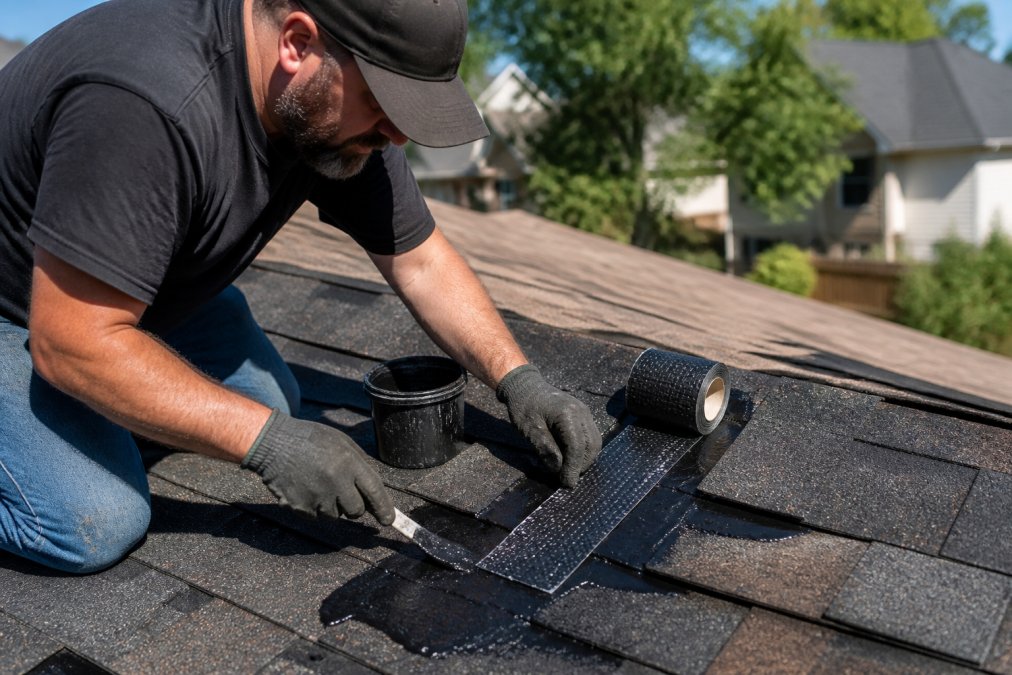
Roofing cement and waterproof tape for small damage
For small holes and cracks, clean the area thoroughly and dry it. Apply roofing cement or waterproof tape, ensuring a secure seal.
Patching damaged shingles
For individual damaged shingles, a temporary patch can be applied using a piece of roofing felt or a spare shingle, secured with roofing cement. This is a short-term fix until a permanent repair can be made.
Larger damage requiring temporary coverage
For larger areas of damage, a heavy-duty tarp is the most effective temporary solution. Secure the tarp firmly to the roof structure, ensuring it overlaps damaged areas generously and is weighted down or tied off to prevent wind damage. Professional tarping services are recommended for significant damage to ensure proper installation and safety.
Realistic timeline and limitations
Temporary repairs are designed to prevent further water intrusion for a limited time, typically a few days to a few weeks, depending on the severity of the damage and weather conditions. They are not a substitute for professional, permanent repairs. Relying on temporary fixes for extended periods can lead to secondary damage and compromise the structural integrity of your roof.
Emergency Roof Tarping Services and Setup
A temporary tarp prevents water intrusion while you arrange permanent repairs, especially for large areas of missing shingles or structural damage. Proper tarping involves securing the material to create a watertight barrier, often extending well beyond the damaged area to prevent wind uplift and further water entry.
Documenting Damage for Insurance Claims
Insurance companies require detailed, timestamped documentation before approving claims. Start documenting immediately after the storm; poor documentation commonly delays or reduces claim payouts.
Immediate photo and video documentation checklist
- Exterior roof damage: Wide shots from ground level showing the overall roof and damaged areas from multiple angles (north, south, east, west sides). Close-ups of each damaged section: missing shingles, cracked shingles, lifted edges, dents, punctures, or torn flashing. Include at least one photo showing the roof address or house number for reference.
- Gutter and downspout damage: Photos of bent, separated, or debris-clogged gutters. Show how water is backing up or overflowing if visible.
- Flashing damage: Close-ups of damaged flashing around chimneys, vents, skylights, or roof penetrations. Show separation, cracks, or corrosion.
- Interior water damage: Photos of water stains on ceilings, walls, and insulation. Capture wide shots showing the extent of staining and close-ups showing discoloration patterns. Document wet insulation, damp drywall, or pooled water in the attic.
- Debris damage: Photos of tree branches on the roof, debris in gutters, or debris damage to landscaping, vehicles, or other structures.
- Video walkthrough: Record a 2-3 minute video panning across roof damage, interior water stains, and affected areas. Narrate the date, time, and storm conditions for context.
Create a detailed damage inventory
- Storm details: Date and time the storm occurred, duration, weather conditions (wind speed estimates, hail size if applicable, rainfall intensity, lightning strikes nearby). According to Environment and Climate Change Canada, wind gusts can reach significant speeds during severe storms, and hail can range in size from pea-sized to golf-ball-sized or larger.
- Damage location map: Sketch or describe the location of each damaged area on the roof (e.g., “north-facing slope near the ridge,” “around the left-side chimney flashing”). Note the approximate square footage of affected area.
- Damage description: For each area, note the type of damage (missing shingles, cracked shingles, lifted shingles, hail dents, punctures, flashing separation, etc.) and the number of shingles or linear feet affected.
- Secondary damage: Document water intrusion into the attic, interior water stains, wet insulation, or signs of active dripping.
- Pre-existing condition notes: If you’re aware of any pre-existing roof damage or repairs, document those separately so the adjuster doesn’t confuse old damage with storm damage.
Preserve damaged materials
Do not discard damaged materials until your insurance adjuster has inspected them, unless it is necessary to prevent further damage. If you must remove materials, photograph them in place before removal and keep them in a safe location.
Interior water mitigation and mold prevention documentation
- Photograph wet areas: Document all visible moisture on ceilings, walls, insulation, and flooring. Note the date and time of each photo.
- Monitor for mold: Check affected areas daily for the first week. If you see mold, photograph it and contact your insurance company immediately. Do not attempt to clean mold yourself; improper cleanup spreads spores.
- Dry out wall cavities: Open windows and doors, use portable dehumidifiers and fans to remove moisture. Document your drying efforts with photos and notes on dates and times equipment ran.
- Remove standing water: Use wet-dry vacuums or towels to remove standing water from floors, attics, or crawl spaces. Photograph the process and the areas after water removal.
Filing the claim
Submit your detailed documentation to your insurance provider promptly. Be prepared to answer questions and provide additional information as requested. Keep copies of all correspondence.
Request a professional roof inspection
Even if you believe the damage is minor, a professional inspection can identify issues you might miss. HighLow Roofing & Exteriors offers comprehensive roof inspections to assess storm damage and provide a detailed report for your insurance claim.
Keep a copy of all documentation (photos, videos, inventory, inspection reports, and claim correspondence) in a secure location, both digital (cloud storage) and physical (printed copies). This protects you if disputes arise or if you need to file additional claims for secondary damage discovered later.
When to Call a Professional Roofer
Call a professional roofer if you have:
- Large areas of missing or severely damaged shingles
- Structural damage visible from the attic (sagging decking, cracked trusses)
- Damage to flashing, valleys, or roof penetrations
- Water intrusion that’s widespread or difficult to locate
- Damage you’re uncomfortable accessing or repairing yourself
- Multiple layers of roofing that need professional removal
HighLow Roofing & Exteriors provides emergency roof inspections and repairs throughout Southern Alberta. Our team assesses storm damage quickly and recommends the best repair approach for your situation. We handle insurance documentation and work directly with adjusters to simplify the claims process.
Preventative Maintenance After the Storm
Inspect your roof twice yearly:
- Spring: Check for winter damage and debris
- Fall: Clear leaves and prepare for winter weather
Maintain gutters and downspouts:
- Clean gutters quarterly and after storms
- Ensure downspouts direct water at least 6 feet from the foundation
- Repair leaks or damage immediately
- Install gutter guards to reduce debris accumulation
Trim tree branches:
- Remove branches hanging over the roof
- Cut back branches that could break in wind
- Maintain clearance from the roof line, ideally 6 to 10 feet, to prevent damage and allow for inspection and maintenance.
Check flashing and penetrations:
- Inspect roof vents, chimneys, and skylights for gaps or separation
- Reseal flashing with roofing cement if needed
- Replace deteriorated flashing before leaks develop
Monitor your attic:
- Check for new water stains after heavy rain
- Ensure adequate ventilation to prevent moisture buildup
- Verify insulation is dry and in good condition
Storm damage to your roof demands quick action and careful documentation. The steps you take in the first hours after a storm determine how much secondary damage occurs. If you’re unsure about any aspect of assessment or repair, professional guidance protects your home and your investment. HighLow Roofing & Exteriors handles emergency storm damage assessment and repairs for homeowners across Southern Alberta.
Frequently Asked Questions
What should I do immediately if my roof starts leaking during a storm?
Move valuables away from the leak and place buckets or tarps to catch water. Turn off electricity to affected areas if water is near outlets or light fixtures. Open attic access if safe to do so and look for the leak source. Do not go on the roof during active storms; wait until conditions are safe. Once the storm passes, inspect the attic for water intrusion and document all damage with photos for insurance.
How can I identify the source of a roof leak from inside the attic?
Look for water stains, wet insulation, and discoloration on the roof deck or rafters. Trace the water path upward; leaks often travel along structural members before dripping. Check for damaged shingles, missing flashing, gaps around vents, or separated underlayment visible from inside. Mark the leak location and inspect the exterior above that spot for missing shingles, cracked flashing, or gutter blockages that may have caused water intrusion.
Can I repair a leaking roof myself, or do I need a professional?
Minor leaks around flashing or small shingle damage can be temporarily sealed with roofing cement or waterproof tape. However, structural damage, multiple leaks, or water damage affecting insulation and framing require professional assessment. Storm damage often involves hidden structural issues that compromise safety. A roofing professional can evaluate the full extent of damage, ensure proper repair, and verify that water mitigation has prevented mold or rot.
Does homeowners insurance cover storm-related roof repairs?
Most homeowners insurance policies cover sudden storm damage to roofs, including wind, hail, and heavy rain damage. Coverage depends on your policy terms and deductible. Document all damage with photos and written descriptions immediately. Contact your insurance provider to report the claim and request an adjuster inspection. Keep receipts for any emergency repairs or temporary measures you take to prevent further damage; these are typically covered as mitigation costs.