

Table of Contents
- Visual Signs of Moisture Damage in Siding
- How to Inspect Siding for Water Damage
- Siding Moisture Barrier Inspection
- Preventing Wood Rot in Siding
- DIY vs. Professional Repair: When to Call an Expert
- Insurance and Warranty Implications
- Conclusion
- Frequently Asked Questions
Last Updated: October 2, 2026
Visual Signs of Moisture Damage in Siding
Moisture infiltration in siding is one of the most damaging threats to your home’s exterior envelope. Unlike a roof leak you can see dripping into a bucket, water damage in siding often hides behind panels until the structural integrity is already compromised. The signs of moisture damage in siding range from obvious visual cues to subtle indicators that require a closer inspection.
At HighLow Roofing & Exteriors, we’ve inspected many homes across Southern Alberta where moisture problems started small and became expensive. The good news: you can catch most issues early if you know what to look for.
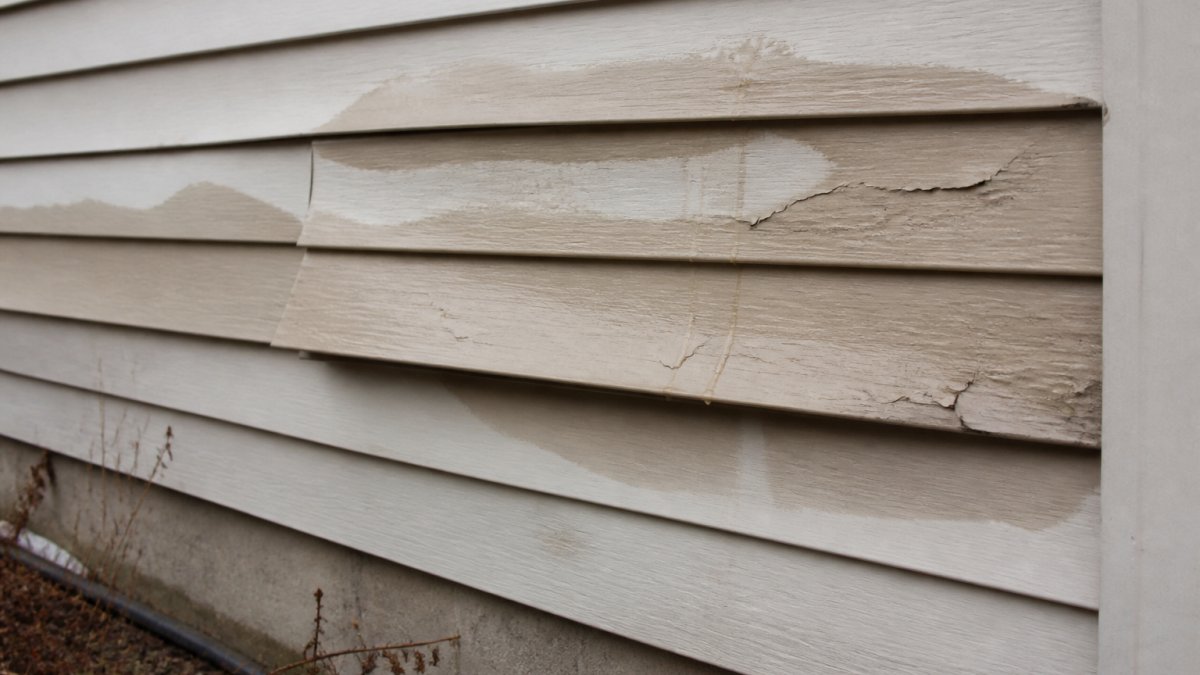
Warping, Buckling, and Bulging Panels
Warping and buckling happen when moisture gets trapped behind siding panels. Water causes the material underneath to swell. As it dries, it shrinks. This cycle repeats, and the panels start to bend outward or pull inward.
Bulging panels are a red flag. They indicate moisture has accumulated in the sub-siding layer or the moisture barrier has failed. Look for:
- Panels that bow outward visibly from the wall
- Indentations or dimples in the surface
- Seams between panels that no longer line up
- Sections that feel soft or spongy when you press gently
Thermal expansion and contraction make this worse in Alberta’s climate. Temperature swings between seasons cause materials to expand and contract. If moisture is already present, this movement accelerates warping.
Peeling or Bubbling Paint and Wallpaper
Paint and wallpaper bubble when moisture pushes from behind. The water vapor builds pressure under the finish coat and causes it to separate from the substrate.
You’ll see this on interior walls near exterior walls, especially in bathrooms, kitchens, and basements. The bubbles start small. Over weeks or months, they spread. When you press on a bubble, you may feel water inside.
Peeling paint follows the same pattern. It starts at seams, corners, or edges where moisture finds a way through. The paint curls away from the wall as the moisture underneath continues to work.
This is different from normal paint failure. Normal peeling happens gradually over years. Moisture-driven peeling accelerates and often appears in clusters rather than uniformly across a wall.
Water Stains on Interior Walls and Ceilings
Water stains are the clearest sign moisture has made it through your exterior cladding. Brown, yellow, or gray discoloration spreads across drywall or plaster. The stains often appear in patterns that follow the framing or the path water took as it ran down inside the wall.
Stains near the ceiling line suggest water entered at the roofline or where the siding meets the soffit. Stains lower on the wall point to problems with the siding itself, flashing, or caulking at ground level.
Fresh stains are wet or damp to the touch. Older stains may be dry, but they mark where water damage has occurred. Multiple stains in the same area suggest an ongoing problem, not a one-time event.
How to Inspect Siding for Water Damage
A proper inspection combines visual observation with tools and systematic checking. You don’t need professional equipment to catch most problems early, though one inexpensive tool, a moisture meter, can reveal hidden moisture before visible damage appears.
Step 1: Check Exterior Cladding and Flashing
Start outside. Walk around your home and look at every section of siding. Pay attention to:
- Areas where siding meets roof or soffit
- Corners and edges where panels join
- Spots around windows and doors
- The base where siding meets the foundation
Flashing is the metal or rubber barrier that directs water away from vulnerable joints. Flashing often fails before the siding itself does. Look for:
- Gaps between flashing and siding
- Rust or corrosion on metal flashing
- Separation or lifting of flashing edges
- Missing or damaged flashing entirely
Poor installation is a common culprit. If flashing was installed incorrectly, water bypasses it completely. This is why professional installation matters, correct flashing placement prevents years of moisture problems.
Step 2: Use a Moisture Meter for Hidden Damage Detection
A moisture meter is an inexpensive handheld tool (available at any hardware store) that measures moisture content in materials. It removes guesswork from your inspection and detects moisture trapped inside walls or behind siding before it causes visible damage.
How to use it:
Press the meter’s two pins into the siding material or, if accessible, into the sheathing or framing behind it. The digital or analog readout shows moisture percentage. For wood, a normal reading is 12-15%. Readings above 20% indicate active moisture problems.
Where to take readings:
- Around window and door frames (common entry points)
- At corners and seams where panels meet
- Near visible water stains or discoloration
- At the base of walls, especially on the north side (shaded areas stay damp longer)
- In areas that experienced recent rain or snow melt
- Behind gutters and downspouts
What the readings tell you:
Step 3: Examine Caulking and Seals
Caulking is the sealant between siding panels, around trim, and at transitions. It fails before siding does. When caulk cracks or pulls away, water finds a direct path inside.
Look for:
- Gaps or separation from the surface
- Cracking or peeling caulk
- Discoloration or mold growth on caulk
- Areas where caulk is missing entirely
Siding Moisture Barrier Inspection
The moisture barrier (also called the weather barrier or house wrap) sits between your siding and the structural sheathing. It’s designed to shed water that gets past the siding while allowing vapor to escape. When the barrier fails, moisture gets trapped and causes rot.
Signs of barrier failure include:
- Water stains appearing weeks after rain
- Mold or mildew growth on interior walls
- Soft spots in the wall when you press on it
- Musty or damp smells in interior spaces
Preventing Wood Rot in Siding
Wood rot happens when moisture stays in contact with wood for extended periods. The fungal decay weakens the material until it crumbles. Once rot starts, it spreads quickly.
Prevention is far simpler than repair:
- Keep gutters and downspouts clear so water drains away
- Maintain caulking around windows, doors, and trim
- Ensure proper grading around your foundation so water slopes away
- Trim tree branches that shade siding and keep it damp
- Inspect siding annually for damage or gaps
Addressing Poor Installation and Thermal Expansion
Poor installation is one of the biggest causes of moisture problems. If siding wasn’t installed with proper gaps for thermal expansion and contraction, panels bind up as temperatures change. This creates stress points where water finds entry.
Correct installation includes:
- Proper spacing between panels to allow movement
- Flashing installed before siding goes over it
- Caulking applied only where needed, not as a seal everywhere
- Ventilation gaps left open to allow air circulation
DIY vs. Professional Repair: When to Call an Expert
Some moisture problems you can address yourself. Others require professional help.
Handle these yourself:
- Replacing caulking around windows and doors
- Clearing gutters and downspouts
- Trimming vegetation near siding
- Applying protective coatings or sealers
Call a professional for:
- Replacing large sections of siding
- Addressing flashing problems
- Fixing the moisture barrier
- Treating active mold or mildew
- Repairing structural damage from rot
Insurance and Warranty Implications
Moisture damage can affect your home insurance and any warranties on your siding or roof. Understanding the implications helps you handle claims correctly.
Document everything:
- Take photos of damage before and after any repairs
- Keep records of maintenance you’ve performed
- Save receipts for professional inspections and repairs
- Note dates of damage discovery and when it occurred
When filing a claim, provide your insurance company with:
- Photos of the damage
- A professional inspection report (if available)
- Maintenance records showing you cared for the property
- Documentation of when the problem started
Conclusion
Catching signs of moisture damage in siding early prevents expensive repairs. Visual inspection combined with a moisture meter gives you a clear picture of your home’s condition. Small problems like failing caulk or damaged flashing are easy to fix. Ignored problems become structural damage.
Frequently Asked Questions
How can I tell if water is getting behind my siding?
Look for interior water stains on walls and ceilings, especially near exterior walls. Check for soft spots, mold growth, or mildew odors inside. Use a moisture meter on interior drywall near siding to detect elevated moisture levels. Peeling wallpaper or bubbling paint on interior walls often signals moisture infiltration from behind the exterior cladding. If you notice multiple signs together, water is likely seeping through gaps in flashing or caulking.
What’s the best way to inspect siding for water damage?
Start by walking around your home’s exterior, looking for warping, buckling, or bulging panels. Press gently on the siding to check for soft spots that indicate rot. Examine all flashing around windows, doors, and roof lines for gaps or separation. Use a moisture meter on the sub-siding and underlying wood to measure moisture content. Check caulking for cracks or deterioration. Inside, look for water stains and test drywall moisture near exterior walls. Document findings with photos for your records.
How does a moisture barrier help prevent wood rot in siding?
A moisture barrier (typically a membrane or wrap) sits behind the exterior cladding to block water from reaching the structural wood and insulation. It allows vapor to escape outward while preventing liquid water from seeping inward. Proper installation with overlapping seams and sealed penetrations is critical. Climate and temperature swings cause thermal expansion and contraction, which can compromise barriers if they’re not correctly installed. Regular inspection of the moisture barrier during maintenance helps catch degradation before it leads to structural damage and dry rot.
When should I hire a professional instead of attempting repairs myself?
Call a professional if you find extensive water damage, soft or spongy wood, visible mold growth, or structural concerns. If moisture penetration has reached the sub-siding or interior framing, DIY fixes won’t address the root cause. Professionals can properly assess the exterior envelope, identify hidden moisture, and ensure repairs meet building codes. They also handle insurance claims and warranty documentation. For isolated caulking or paint issues, DIY touch-ups are acceptable, but widespread warping, buckling, or seepage requires expert intervention.